Wallpaper Changer
posted by George @ 3:08 PM
0 comments

The following methods of adding images to your blog should cover most of your needs. The method I described earlier using Flickr is good but sometimes you may want to add buttons that go to your supplemental blog or other web site. You may also want to use a free hosting site other than Flickr. The methods I describe here use html code. This exploits the option that Blogger.com provides in the options to add new posts that is called “Edit html”. You can also use this same html code to add images to the template of your blog. Html stands for Hypertext Markup Language which is the document format language used on the world wide web. Adding images to a web page isn’t quite like adding an image to a Word document. Word saves the image as part of the document. Web pages save text in the html file but you add links to images which are saved externally to the html file. I recommend that you copy the html code on this page (highlight the code with your mouse and then hold down the “Ctrl” key and type the letter “C”) and paste it into a Word document and then edit it as I show in the color coding. The “click here to see demo” button in Part 1 of this series provides a demonstration of how I posted this article after having written it in Word and it includes some steps about adding images. In my “Sample Image Postings” page, I display examples of each of the three methods below of adding images to your blog and repeated the html code below the image so you don’t have to refer back to this page.
I found a pretty handy web site that provides a way of experimenting with html code. The folks at W3 Schools were nice enough to provide html examples. What is cool is they provide “Try it Editors” where you can edit some html code on the left side of the page, click on a button that says “Edit the text and click me” and then see how the html code would look on a web page on the right side of the screen. I have provided some links to specific examples in the following directions.
Click to Enlarge Image
This code will add a small image to the main page of your blog and then will produce a larger picture when you click on the image.
<a href="http://photos6.flickr.com/11413167_0568790dd3.jpg" title="Sample Image Produced From Flickr"><img src="http://photos6.flickr.com/11413167_0568790dd3_m.jpg" /></a>
You need to replace the blue text with the link to a large version of your image. You need to replace the red text with the link to a small version of your image. You need to change the green text with a title which is the text that is displayed whenever you hover over an image with your mouse cursor without clicking on it. The title section can be deleted to produce the following (which will still function):
<a href="http://photos6.flickr.com/11413167_0568790dd3.jpg"><img src="http://photos6.flickr.com/11413167_0568790dd3_m.jpg" /></a>
Unfortunately, W3 Schools didn’t provide an example exactly like the one I show above. However, you can click here to open one of the pages on their site in a new window, delete everything in the left column. Then, copy the above html code and paste it in the left column. Then, click on the button that says “Edit the text and click me”. After you try this, you may want to replace the links to the images with ones of your own photos.
Inserting a Non-Clickable Image
If you simply want to post an image to your blog that is not clickable, the following html code is what you need.
<img src="http://photos6.flickr.com/11413167_0568790dd3.jpg" />
You need to replace the blue text with the link for the image.
You may need to adjust the size of the image displayed on your page. You can edit your image to make it smaller but you may find this method to be easier.
<img src="http://photos6.flickr.com/11413167_0568790dd3.jpg" width="720" height="514">
You need to replace the blue text with the link for the image. Replace the green text with the image width in pixels and the red text with image height in pixels. (Note that a pixel is one of the tiny colored dots that make up an image). Every image editing program that you choose to use will tell you the height and width of an image in pixels.
The W3 Schools provided a good example of resizing a non-clickable image. There is not usually a problem with making an image smaller. Making an image larger may introduce undesirable artifacts. In the example, try changing both the width and height of the one of the images in the example to 200. It is also important to use height and width that has the same proportions as the original image; otherwise, you will end up stretching the image. In the example, try increasing the height of the image but leave the width unchanged. After you make any changes, be sure to click on the button that says “Edit the text and click me”. To open the example in a new window, click here.
Adding a Button
If you want to create a clickable button that brings you to a web address, just use the following html code:
<a href="http://georgesfreeware.blogspot.com/2005/02/wink.html"><img src="http://img114.exs.cx/img114/2198/upclickheretoseedemo6cp.jpg"></a>
The blue text is the address of the web site and the red text is the location of the image for your button.
The W3 Schools example of a button includes the same method of resizing the button image that I demonstrated in the previous section. I didn’t include this in the html code above because I think most folks will create a button of the size they want. There is no need for the image height and width information unless you want to resize the button. To open the example in a new window, click here.
One of my readers sent a link to me for a web site, GRSites.com, which has a very good button maker along with other useful stuff.
Return to Part 2, Adding Images to Your Blog
posted by George @ 1:34 PM
0 comments
When I am finished writing, I copy and paste all the text (with any hyperlinks) into the blog.
This same procedure works in most e-mail programs also. It is pretty useful if you want to send someone a link that wraps to more than one line. If you send an e-mail to someone with a link wrapped to more than one line, their e-mail may put a hard return at the end of the line so that the link does not work. This procedure will fix it so it works. When you send an e-mail with a link like this, your e-mail program may ask if you want to send it as plain text or web page (html) format. Select the option that either says web page or html.
Return to Part 1, Introduction
posted by George @ 1:25 PM
0 comments
The first set of directions below is for initially setting up Flickr to post images to your blog (luckily you only have to do this once). I have customized the default layout of how Flickr posts images to your blog. My reason for doing this is that clicking on the small image on your blog using the default layout not only makes the image larger but also brings you to the Flickr web site. I’d rather my readers not go to the Flickr site because they can navigate through my other images that are posted there. Since the images that I post to my blog are screen shots, the images make very little sense by themselves so I’d rather they read my blog first. My customization simply enlarges the image without opening the Flickr web site as you can see in the examples I posted below. Before you start with the procedure below, you should decide how you want text to appear with your picture. The text can be positioned below the picture or it can wrap around the left or right side of the picture. To help you decide, I provided examples of each below. Even if you already have a Flickr account, you may be interested in how I changed the layout. You may decide you prefer the Flick default method (in which case you can basically stop after you complete step 17).
The second set of directions further down this page is how to upload pictures to Flickr and post them to your blog.
Text is aligned below the Photo
Text wraps around the left side of the Photo
Text wraps around the right side of the Photo
Directions to Create a Flickr Account and Initial Set Up:
Text is aligned below the Photo:
<a href="{photo_src}" title="{photo_title}"><img src="{photo_src_m}" alt="{photo_title}" /></a>
<p>{description}</p>
<br clear="all" />
Text wraps around the left side of the Photo:
<div style="float: right; margin-left: 8px; margin-bottom: 0px;">
<a href="{photo_src}" title="{photo_title}"><img src="{photo_src_m}" alt="{photo_title}" /></a>
<br />
</div>
{description}
<br clear="all" />
Text wraps around the right side of the Photo:
<style type="text/css">
.frame-set { float: left; text-align: center; margin-right: 8px; margin-bottom: 0px; }
</style>
<div class="frame-set">
<a href="{photo_src}" title="{photo_title}"><img src="{photo_src_m}" alt="{photo_title}" /></a><br />
</div>
{description}
<br clear="all" />
The layout options above display the medium sized image on your main page and when you click on it, produces a large version of the image. You can replace photo_src_m in the above options with photo_src_t if you want the thumbnail to display on your main page instead of the medium sized image.
If you want to change the layout after you have Flickr set up, you can access the layout after you log in by clicking on “Your Account” on the home page. Then click on “Your Blogs” and then “Layout”.
Directions on How to Upload Pictures to Flickr and Post Them to Your Blog:
Return to Part 2, Adding Images to Your Blog
posted by George @ 11:55 AM
2 comments
Return to “Adding Images to your Blog Using Flickr”
posted by George @ 7:40 PM
0 comments
Return to “Adding Images to your Blog Using Flickr”
posted by George @ 7:35 PM
0 comments
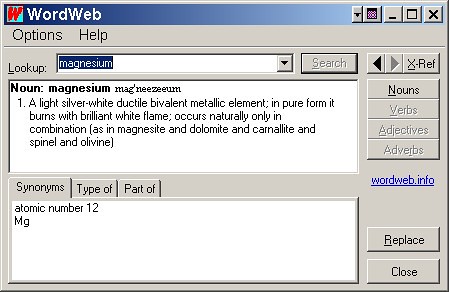
WordWeb is an uncomplicated to use dictionary and thesaurus. It comes with a local database of definitions and is dictionary is quite complete. You not only get the spelling of the word, but the meanings dealing with every category for that word such as nouns and verbs. You are also given synonyms, attributes, the different types, and the types of the subject word. If a word is not found in the local database, it offers to look up the word using the internet.
The layout is expandable to the full screen but it's not really necessary as you can run this program in a small window quite well. There is an option that lets you keep the program "on top" which makes stay on top of any application no matter where you click. The top box is where your word is entered. The second box shows the definition of the word. The third box contains tabs with related words. To the right are the button icons which you can click on for the definition of the word as a noun, verb or adjective which ever is applicable. You can also scroll down the definition to get the same information.
Return to “Adding Images to your Blog Using Flickr”
posted by George @ 7:32 PM
0 comments
<EMBED SRC="http://www.myimagestore.info/upload/images/OrE71537.swf" WIDTH=659 HEIGHT=526 quality=low loop=false TYPE="application/x-shockwave-flash" PLUGINSPAGE="http://www.macromedia.com/shockwave/download/index.cgi?P1_Prod_Version=ShockwaveFlash"></EMBED>
The blue text is the location of your Flash file that is provided by the hosting site. The red test is the width and height of your Flash file.
<a href="http://georgesfreeware.blogspot.com/2005/02/wink.html"><img src="http://img114.exs.cx/img114/2198/upclickheretoseedemo6cp.jpg"></a>
The red text is the location of the image for your button. GRSites.com has a very good button maker. You can up load the button image to the Flickr free image hosting site and then paste the link to the button image in the red text above.
posted by George @ 1:04 PM
2 comments
I think you will agree that the images using Flickr look better than the ones posted to my blog using the Hello program. The exact same images were posted using both Flickr and Hello. I listed the html code below the Flickr images so you wouldn't need to go back to the previous page to copy the html code. <a href="http://photos6.flickr.com/11413167_0568790dd3.jpg" title="Sample Image Produced From Flickr"><img src="http://photos6.flickr.com/11413167_0568790dd3_m.jpg" /></a> You need to replace the blue text with the link for the large image. You need to replace the red text with the link for the small image. You need to change the green text to a title (which is the text that is displayed whenever you hover over an image with your mouse cursor without clicking on it). 
Clickable Image Posted to Blogger.com Using "Add Image" Button
Clickable Image Posted to Blogger.com Using Hello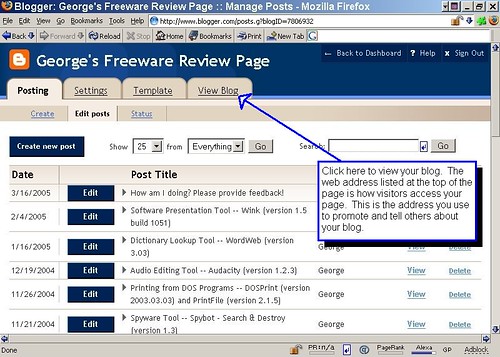
Clickable Image Posted to Flickr and Added to my Blog Using the following html code:
Clickable Image Posted to Blogger.com Using "Add Image" Button
Clickable Photograph Uploaded to Blogger.com using Hello
Clickable Photograph Posted to Flickr and Added to my Blog Using the Following html code:
<a href="http://photos2.flickr.com/1436299_29bd9bd852.jpg" title="Sample Photograph Produced From Flickr"><img src="http://photos2.flickr.com/1436299_29bd9bd852_m.jpg" /></a>
You need to replace the blue text with the link for the large image. You need to replace the red text with the link for the small image. You need to change the green text to a title (which is the text that is displayed whenever you hover over an image with your mouse cursor without clicking on it).
Sample Image (Not Clickable) Posted to Flickr and Added to My Blog Using the Following html Code:
<img src="http://photos6.flickr.com/11413167_0568790dd3.jpg" />
You need to replace the blue text with the link for the image.
Clickable Button that Brings You to a Web Address Using the Following html Code:
<a href="http://georgesfreeware.blogspot.com/2005/02/wink.html"><img src="http://img114.exs.cx/img114/2198/upclickheretoseedemo6cp.jpg"></a>
posted by George @ 8:25 PM
0 comments